MAKE A BOOK
Do you like to write stories? Would you like to publish a book of your own? My children published lots of their own books when they were young and their books now sit proudly on our bookshelves, right next to mine. Here's how they did it. Feel free to print the instructions out if you like. Teachers, this exercise makes a great workshop to do in coordination with your school’s art teacher.
The first step, of course, is to write your story! Be sure and only use one side of each piece of paper you write on. Need to come up with an ideas? Visit my WRITING PROCESS Page
Next, assemble the following materials:
A large pad of inexpensive newsprint paper
Good quality legal size paper (8" x 14")
One 8"x14" piece of good quality colored paper - in your favorite color
Two pieces of heavy cardboard - 71/2" x 9"
Two-inch wide tape (duct tape or packaging tape)
Pushpins
Corrugated cardboard - larger than 8"x14"
A needle and thread
Scissors
Wall paper, heavy duty wrapping paper, or fabric (for your cover) White glue if you are using fabric.
Rubber cement if you are using paper.
LET'S BEGIN!
First of all, take several sheets of your newsprint, fold them up the back like a book and staple them. This will be our dummy book - sort of a first draft of our finished book.

Now, do you want illustrations in your book? These can be drawings, photographs, graphics you make on your computer, collages... Use your imagination! If you decide you want illustrations (I hope you do.), you should read through your story and picture it in your mind. Every time the picture in your mind changes, draw a line at the end of that sentence.
Now, number each section because we're going to cut along the lines you've drawn and we don't want to mix up the sections.
Okay. Now cut along the lines and paste the sections in order into your newsprint dummy book. Only paste one section on a page to leave room for a picture. Look at some other books to see how the pictures and story are arranged on the pages.


Now think about what kind of picture you would like on each page. Draw a quick stick-figure sketch of your picture, or if you prefer, just write a sentence describing the picture you want on that page. Great! Now your dummy book is done. Starting on the first page, go through and number your pages. Open your dummy book and press it flat. Can you see how each piece of paper actually makes four pages in your book? In order to find out how many sheets of paper you need for your real book, count how many pages you have, then divide by four. If the number doesn't divide evenly and you have extra pages, don't worry. Better to have too many than too few. Count out as many pieces of your better quality paper as you need, then add one more sheet of paper to the pile for your title, dedication, and author biography pages. (We'll talk more about those later.) Stack your pages neatly, then carefully fold your pages in half so that they look like a book, open them out flat again and secure them with a paper clip.
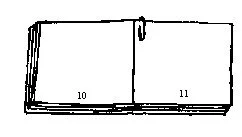
Go through your pages now and neatly number them at the bottom, but don't number the front or back of your first page. These will be your title and dedication pages. Put a number 1 on the next page and then number all the rest of the pages in order. Now it's time to work on your pages. Open your dummy book to page number 1. Neatly copy the text onto page number 1 of your real book. If you prefer, you can type it on a computer then cut it out and paste it in like my son did below. Be sure to leave room for your drawing.

Once the text is done, draw the picture you sketched or wrote about on page 1 of your dummy. Now go through and do the same for the rest of the pages in your real book. Once you're all done, you can work on your title, dedication, and author biography pages. The Title page should be the first one in the book - the one you didn't number. Write your title here, followed by the author's (that's you!) name. Draw a picture if you like. Look at title pages of some other books for ideas. On the next page you can write your dedication. Dedicate your book to someone you love or admire - someone who is very important to you. Now, turn to the back of your pages, to the blank page after your story ends. This is your page. The author biography page. Paste a picture of yourself here and write a little about yourself. The people who read your book will enjoy learning something about the author! You can look at other books to get some ideas about what to write if you'd like.
Now let's work on the cover!
Get out your two pieces of cardboard and your tape. Cut a piece of tape 10 inches long. Carefully lay it down, sticky side up, on your table. Fold your pages in half and hold them just above the tape as shown before so you can see how wide they are. Lay your two pieces of cardboard next to each other on the tape, leaving room for the pages in the middle. Lay the pages aside for now


Now cut a little strip of paper 8 inches long and just as wide as the space between your two pieces of cardboard. Set it into the space as shown and then fold the ends of the tape down.

Now back to the pages!
First, open your pages out flat and lay them down upside down. Take your piece of colored paper and clip it to the back.

Next, get out your piece of corrugated cardboard and your pushpin. Lay your pages down upside down - with the colored paper showing - on top of the cardboard. With the pushpin, poke five holes down the center of the pages as shown, approximately the same distance a part.
Now, thread your needle..Push the needle in through hole #1 and come back up through hole # 2. Don't pull the thread all the way through. Now go in through hole # 3 and out of hole # 4. Now go in through hole #5, turn your pages the other way around and come back through hole #4 again. Go in through hole #3 and come out of hole #2.

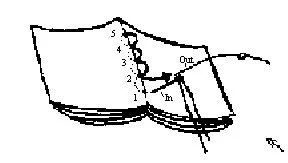
Now you're done sewing. Tie the piece of thread that is sticking out of hole #2 to the piece of thread that is sticking out of hole #1

Back to the covers!
Get your piece of wallpaper, wrapping paper or fabric. Lay it wrong-side-up on your table and lay your cover on top of it. Draw a line an inch wider than your cover all the way around and cut your cover material out on that line.

Now, lay the material aside, and brush the entire back (the back side is the side where you can't see the paper strip that you put in) of your cover with glue.

Hold it firmly for a few seconds, then turn it over and smooth out any wrinkles. Now turn it back over once again and put a dab of glue in each corner of your cover as shown below. Fold the corners of your material over and secure them with the glue.
Lay your material wrong side up on your table again and lay your cover - glue side down on top of it.


Now brush glue all around the edges as shown below and fold the rest of the material edges over.

Now center your pages inside the cover. Apply glue to the back of the colored paper and glue it to your cover on each side, as shown. Now, write your title on a piece of paper and draw a picture if you like. Paste this to the front cover of your book like my son, Ryan, did on his book below. And that's it! You've published you first book. Congratulations! Doesn't it feel great to hold your own book in your hands? Now all that's left to do is throw yourself an author party! If you are doing this as a class project, throw a whole class author party and invite your parents. they will be so excited to see your first published book!
